Ascent to the Taillón from the Col of Tentes
Your first 3000
Your first 3000
The ascent to the Taillón from the Col of Tentes brings us closer to the dwelling of ancient glaciers, deep-rooted traditions and famous legends. The Pyrenees, in this route, gives us the opportunity to immerse ourselves with relative ease in an environment of great peaks, deep gorges and unique forms that mark its strong character. The Ordesa and Monte Perdido National Park next to the Western Pyrenees National Park on the French side extends at our feet as we reach the summit of Taillón 3144 m, an extensive UNESCO Heritage site that not only boasts great and mythical peaks, but also colossal formations created by the action of nature over the years, adding an additional attraction to the fact that it already has every ascent of a great mountain.

The route, with 14.2 km, starts from the lonely car park of Col of Tentes, the rest of the old and unfinished project of communicating the French side with the Spanish side in this area of the Pyrenees. Going through the remains of the French side of this road we arrive to the border, in the Pass of Bujaruelo. This enclave has spectacular views as well as being, a few years ago, a regular passage for locals, pilgrims and smugglers who followed this route that links both valleys. The route then gives us the opportunity to travel the remains of the enormous glacier that thousands of years ago extended a few kilometers down the valley, reaching a thickness of up to 600 m at some points. Unfortunately, nowadays it hardly resists to be converted into several small glaciers that leave to the light the different types of rocks that together with the marine fossils, more and more difficult to find, are mute witnesses of the passage of time. The itinerary leads us through the few reefs that the Gabietos Glacier puts in our way, taking us to its hidden brother, the Taillón Glacier.

This puts some more impediment to save it since it forces us to cross the stream that in form of a waterfall precipitates towards the bottom of the valley. It is at this point where, in addition to beginning the ascent between rocks, we will be joined by those who have climbed from Gavarnie following the path that leads here. The Pass of Sarradets, the anteroom to the refuge that bears its name, is an ideal place to recover your breath while you contemplate another of the privileged landscapes that this route offers. After resting the necessary in the Shelter of Sarradets we undertake the ascent that will take us to the mythical Gap of Roland, natural border between Spain and France. Although before culminating this part of the ascent we will have to cross the dying Glacier of the Gap, always resisting us hardly to not throw the glance towards the Waterfall of Gavarnie that to our left seems to be trying to fill with water the enormous glass that forms the Circus of Gavarnie. Once we have crossed the border, there are several memories and routes of other routes and ascents that converge here, the Sarrios Pass, the ascent of the Casco or the routes through the magnificent Ordesa Valley whose gorge is sinking in front of us.

From this place we continue the ascent that takes us, guided by the line that marks the vertical wall of the mountain, to the False Gap or The Finger of the Taillón. This area, the most delicate of the whole route, is the last hurdle to be overcome to face the final ascent that separates us from the Summit of Taillón. From this summit of 3144 m we can scrutinize the horizon observing the different summits that surround us, the Gabietos, the Perdido... or and try to discover the, from here minuscule, refuge of Góriz, to retake the march that will make us return on our steps again to the Col of Tentes.
For those who are fit and time permitting, and want to save the hassle of driving to Gavarnie from the Aragonese Pyrenees, there is the possibility of ascending from the Bujaruelo shelter. This option, which is also very popular, considerably increases the unevenness to be overcome as we climb from the bottom of the same valley and we will need about 2h 00min to cover the approximately 5 Km that separate the refuge from the Bujaruelo Pass and 1h 30min from the pass to the refuge, once we return. In exchange, this beautiful route will make us travel through a valley of great beauty that will surely compensate us for the tremendous effort that this option requires.
To get to Gavarnie, you must follow the D921 road from Luz Saint Sauveur to Gavarnie, passing through Grède. It is in this village of Luz Saint Sauveur where the different roads converge, which either from, for example, Lourdes or from the A64/E80 motorway through La Pyrénéenne communicate Gavarnie with the rest of France. Similarly, from Bielsa, Biescas or Canfranc, following the roads that cross the Pyrenees from these towns, we can reach Luz Saint Sauveur and from there to Gavarnie. Once there, we must continue without deviating, crossing the town and then turning sharply, leaving the road on our right that leads to Barrage d'Ossoue, another Pyrenean area with mythical peaks, to begin the long ascent until we reach the end of the road where we will find the Col of Tentes car park.
It is important that our friend is used to following us on this type of route, otherwise he will surely have a hard time and will leave with some injury, especially on the pads, given the abrasiveness of this type of rock. Even so, it is advisable to take your protective boots and a harness strap to help us secure you if necessary. We must not forget that they also have their limitations and fears when we go through exposed or abrupt places. No doubt on more than one occasion we will have to give him a hand to climb or descend from a stone, all this added to the height, the unevenness and the distance to save make this a demanding route for him. It is important to be informed of the regulations of the park where the route runs to avoid problems with the gendarmerie, initially would have to be tied on the Spanish side and has prohibited the passage in the French.
Although water is relatively easy to find, it cannot be lacking in our supplies, which we will undoubtedly have to replenish wherever we can to cover the litres that our partner will surely consume. In addition, we cannot lack food that provides the necessary nutrients and energy to resist the effort.
It is not surprising that we find cattle, especially at the beginning of the route. The marmot that lives next to the refuge is usually joined by some goats that know about the free buffet available next to the refuge and come to see what they can get. Apart from this, and except for a few pet mountaineers, who are becoming more and more common, we will not find any other animal company than the one that does not notice our presence and cannot hide in time.
The route starts at the Col of Tentes car park (0h 00min) in Gavarnie.

From here we follow the continuation of the road by which we arrived, a wide track for now conditioned and with educational signs that enliven the first steps of the journey.

In front of us we can contemplate or rather intuit the itinerary that we will follow and that crosses from the north face of the Gabieto Oriental to the Pass of Sarradets under the attentive look of the north face of the Taillón.

The track leads us between blocks of stones to the Pass of Bujaruelo (0h 20min), point of union of numerous routes, among them the one that arrives from the bottom of the valley of Bujaruelo, another of the habitual routes to ascend until the Taillón.

After contemplating the magnificent spectacle that this port offers us, with views of both sides, we take the path that before, from the track by which we arrived, we tried to discover where the route ran.

A first effort that hardly lasts and that quickly returns us to a less demanding terrain. This part of the route, which is quite comfortable at the moment, allows us to imagine the ancient Gabietos Glacier, whose remains are hardly resistant today.

The route as we go into the north side of the mountain is changing its appearance, sometimes forcing us to seek the best place to overcome some points of the route. In them, normally, the path disappears forcing us to go back a few meters to go up the stones and continue our way.

The stone markers, our intuition or the blocks of stones positioned delimiting the path on the other side of the abrupt terrain in which we find ourselves, will serve as a reference to recognize the place where we must face these steps, which under normal conditions do not represent major complications.
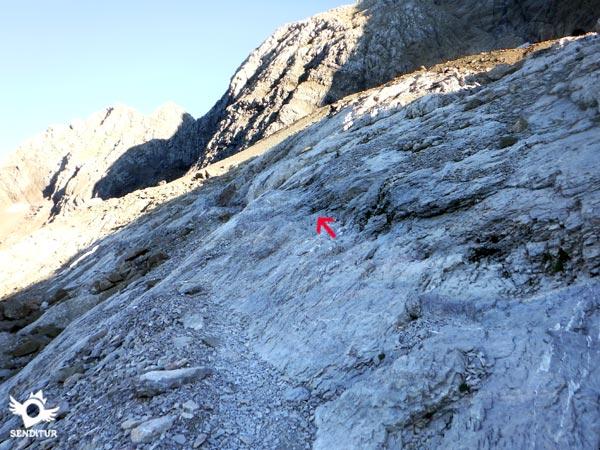
The itinerary takes us through the imposing north face of the mountain in search of its slender northeast edge, which hides for now the unmistakable Taillón Glacier crowned by The Finger or the False Gap.

This stonier area makes us gain height step by step along a well marked path without major complications. Before us is what at first sight seems an almost insurmountable wall through which a mighty creek sometimes falls.
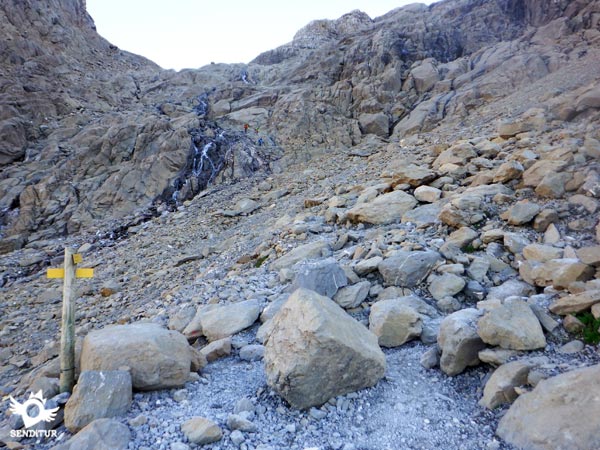
At this point, the path meets the route that goes up from the nearby Gavarnie Waterfall, and together they begin the winding ascent to the Pass of Sarradets. The route leads to the famous chain pass at the waterfall of the stream. This pass has suffered and continues to suffer continuous variations due in part to the flow of the stream, erosion and small landslides.
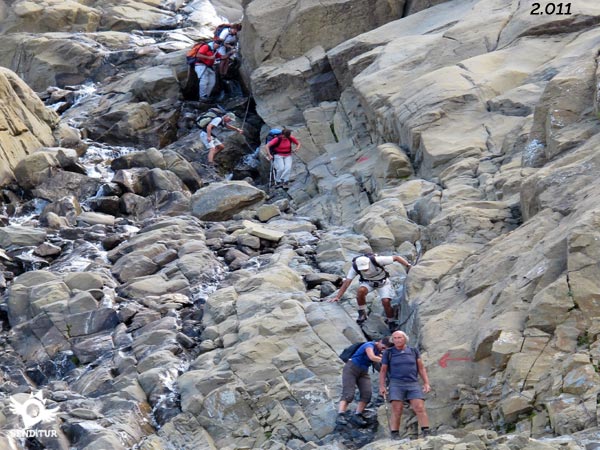
Variations that have led to the disappearance of the already battered chain and the variation of the usual route, which followed the course of the torrent on its right side as we ascend until we find the place to cross it.

Now, depending on the volume of water in the stream, we will have to look for the best place to cross it as soon as we come across it. The old red arrows, painted on the stones, indicate the direction to follow, and serve as a reference to locate the route that continues behind the stones where they are painted.

Depending on the state of the stream, the route goes up a few metres along the old course of the waterfall, where we can see the holes left in the rock by the supports of the old chain, to cross the stream and save the rocks painted with the red arrows and resume the journey. Even with little flow and patience it is still possible to follow the battered stretch of waterfall to the old pass.
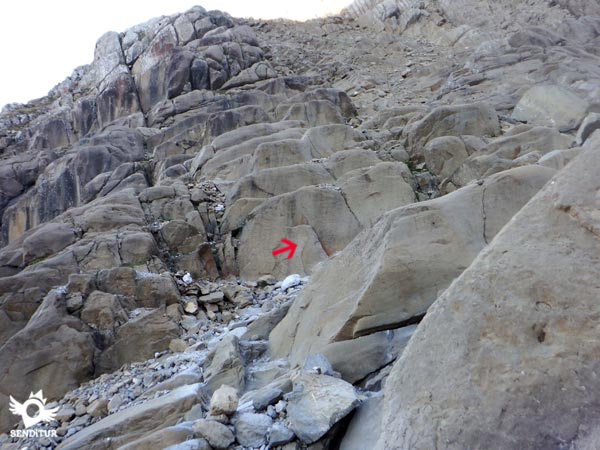
The route takes us to the opposite wall to make us climb through a real chaos of stones following the few red arrows that indicate this route. If we look calmly we can see the course that the battered path follows until it meets the old route that after ascending the waterfall went to the left side leaving the glacier on our right.

Here it is important to take a few seconds to memorize references that will help us on the descent, since it is normal to follow the well-marked path that leads to the beginning of the descent along the old stretch of the chain, making us lose our way and leaving us in a real labyrinth of paths and blocks.

The stone landmarks and the few red arrows give us the guideline to follow while we quickly gain height by winding through the rocky lagoon under the watchful eye of The Finger of the Taillon.

Not without effort we get to enjoy the beautiful panoramic view of the Pass of Sarradets (1h 30min), from which we will begin a gentle descent that will bring us closer to our next objective.

The spectacular setting of the Shelter of Sarradets (1h 35min) allows us to prepare for the next part of the ascent while enjoying the surrounding environment.
The impressive silhouette of the Gap, towards which we are heading, almost masks the rocky and hard climb ahead of us to it. Next to the shelter, the path that gains height quickly runs along the edge of the stone field that leads to the Snowdrift of the Gap.

To find the beginning of this path, we can use as an improvised guide the water canalization that goes down to the refuge from the glacier, since there are many who, confused, go down to the scree and then go up by its side to the path.

While if we continue through the chaos of blocks sticking to the side of the mountain through which we arrived at the refuge, we will soon find the way without having to make a greater effort to recover the lost height.

This stretch should be taken in stride, as we know the distances and the demands required to save them in the mountains are not always what they seem and this should not be an exception.

Once this first terrace has been overcome, it is advisable to take the appropriate references to find, on our return, the point where the descent to the shelter begins.

We are now facing the changing glacier, which usually remains all year round in this part of the route, and which may force us to put on our crampons to cross it, even well into the summer.

Once past this section, we face the final part of the ascent to the base of the gap, a stony path that crosses transversely to the left wall as we are, heading towards it.

After some typical curves, which partly relieve us of the unevenness, we arrive at the steepest part of this area, where we will have no choice but to make a short and simple climb to overcome a small step that blocks our way.

Here we must be vigilant, since the decomposition of the terrain together with the different options that people have tried to look for can lead us to steps of greater difficulty than usual. Once this part is over, we only have a short and winding route until we find ourselves in the middle of the two imposing walls that form the Gap of Roland (2h 30min).
Once we have recovered our breath and enjoyed the wonderful panorama that surrounds us from this exclusive place, we head towards our true objective. Here the different paths that start or arrive at this point can lead us to error, so as a reference to find the right path we can take the right wall of the Gap, as we arrive at it from the shelter.

Leaving behind the itinerary that would take us to the famous Pass of Los Sarrios, we will have to go up the stone blocks until we almost touch the wall of the Gap, where in front of us we will be able to see the beginning of the stony path along which we must continue.

The route takes us along the line marked by the mountain, crossing the slope of stones transversely, which, especially on the way down, forces us to be careful to avoid slips or falls. There are many, although short, steps where the path disappears and we must walk from stone to stone until we find it again, always following the same course.

Soon and without almost noticing it, we start to gain height while little by little the Taillón and the False Gap appear before our eyes. After a hard ramp we will find ourselves face to face with the False Gap or The Finger (2h 55min) as it is also known.

This is, one could say, the most complicated step of the whole route, not because of its technical difficulty but because of the exposure of the route in which there is no option for falls.

We bordered the Finger at its right base as we reached it, on a narrow but sufficient floor with good grips if necessary to secure our passage. Soon we find ourselves before the cavity that is hidden at the base of the Finger, it is here where the route varies again making us pass to the other face of the mountain between the Finger and a big rock that points out the passage.

We could continue on this northern side but the route is blurred and the terrain is more unstable, increasing the difficulty and risk unnecessarily. Once on the other side, we must resume our progress, looking for the most comfortable way for each of us.

From here the more or less wide path returns that will take us to the summit, but before that we will meet again with another fork in which we will have to choose between following the path on the exposed north face with the glacier at our feet or opting for the Spanish side of the mountain and crossing a ridge area, without too much complication.

If we choose this option we will quickly find an opening that will allow us to return to the other side and follow the path much less exposed. It is from this area where we will again face the unevenness that still remains to conquer the summit.

In front of us a clearly visible route that first winds through the mountain and then crosses it almost from side to side until it takes us to the very summit of the Taillón (3h 45min). It is possible to shorten the ascent, at the cost of increasing the inclination of the slope, by taking the shoulder of the mountain straight, but this route requires a greater physical and technical preparation than the usual ascent.
Once we have enjoyed the views that this peak offers, it is time to return following the steps that brought us here.
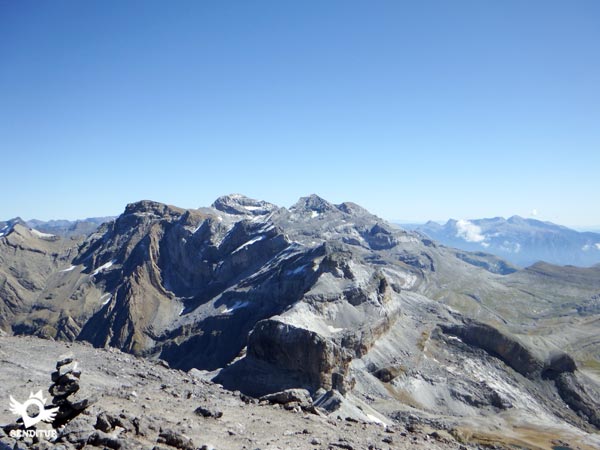
In the descent to the usual precautions that we must always take, we must add the importance of not getting lost in the path or rather the path to follow to avoid being in complicated or too exposed terrain. It is also important to have clear references taken to our climb to find the steps and beginnings of the path that will lead us to the right place.

The conditions of the snow on the glacier and the flow of the stream in the waterfall will surely have varied from how we found them in the ascent, so we should not be confident when we reach them.

For the rest, the descent to the Col of Tentes (5h 50min) is not more complicated than the one added by our physical condition after the effort and the variations of the route we do.
This figure is always indicative as it depends on many factors that may affect it.
The time spent on this type of route can vary greatly due to many factors, the state of the route, our physical condition or the ability we have to move with agility and also if during the tour we must walk putting and removing for example the crampons, without saying how much time we spend enjoying each splendid place through which we will pass. It is therefore important to give yourself a margin, taking into account the hours of sunshine and taking advantage of the first hours of light to gain ground on the route.
The route, without snow and with good conditions allows us to enjoy a great mountain and its abrupt Pyrenean atmosphere without demanding a great knowledge or technical level. In addition, the panoramic views that we can enjoy on clear days more than compensate for the effort required. Even in the middle of summer it is common to find snowdrifts on our route, especially in the Gap, so it is important, of course, to know the state of the route and the conditions we will encounter. With snow or ice, the difficulty of the route is considerably increased, reserving it for experienced mountaineers in this type of terrain. In addition, the route to be followed varies according to the state of the snow and its accumulation, although the already beautiful landscape that surrounds this route becomes a real spectacle worth seeing.
Semi-rigid summer boot, although a little heavier is a good option to which we have to add warm clothes since the changes in the weather and temperature are usually fast and common. In addition to adapting our equipment, footwear and clothing to the weather and mountain conditions, there are several materials that will surely be useful, the crampons and therefore the ice axe or the helmet that protects us from the stones that fall in the area of the Gap, undoubtedly increase the weight of our backpack but it is not nice to miss them in the mountain. At the information office in Gavarnie we have updated data that inform us of the status of the route and the material needed for it. Water and food cannot be missing in a demanding and long ascent, as well as the walking poles, which will undoubtedly be of help to us. A mobile phone with a charged battery, protection against the sun, sunglasses, cream... cannot be forgotten either, as well as a map of the area and the GPS with the tracks of the route, since the fog and bad weather can surprise us relatively easily making it very difficult to follow the route. Consult our list of material and equipment for hiking. Read more.
Physical
The advantage of starting the route at a considerable height and having the first few kilometers more or less comfortable due to the gentle slope makes this tour seem less demanding than it really is. We will find almost all the slope concentrated in the second half of the route, but with the advantage of staggering, allowing us to recover from every effort in the small rest areas that we find. The ascent to the Pass of Sarradets, among the rocks, is very pleasant. It is the stretch between the refuge and the gap where it is important to hold back and keep strength in this hard slope, because even though it does not seem like it, there is still a lot of walking and climbing to do. Otherwise, for someone who is used to it, it is an ascent that, if taken calmly enough, should not cause any great physical problems.
Technique
Although it is a route catalogued as not very difficult, we must not forget that we are in the high mountains and that this cataloguing already starts from a high level of difficulty in comparison with other routes, both in the physical and technical aspects. A priori, there are three most conflictive points of the route, the area of the waterfall, where the chaos of blocks and the course of the stream demand calm to progress safely, the final access to the Gap, which together with the state of the snow and a small climb, simple but somewhat exposed, can put us in trouble of not having the necessary experience and confidence and the passage of the False Gap where slips are not allowed given the exposure of this part of the route and the difficulty to follow the correct route in some points of this short stretch. The falling of stones produced by the action of erosion or the mountaineer who walks in front of us, are a common occurrence especially in the area of the Gap. Pay attention to the slips in the scree, although they are well stepped on the slope and the tiredness to our descent can play a bad trick. On the other hand, it is not strange to come across snowdrifts but sections where the rocks are frozen and we have to progress on the verglas or in mixed, considerably increasing the technical difficulty of the route. We will also have to face along the path that takes us to the base of the waterfall with a couple or three steps in which the path disappears forcing us to progress through the slabs to save the normally dry streams that cut our way, but these steps taken in the right place and in normal conditions are not complicated.
Orientation
The few crossroads that we are going to encounter are well signposted indicating where each path follows, the problem comes at various points by the different routes that have been created and that many of them lead to complicated and unnecessary steps. As it could not be otherwise are the most complicated points, the section of the waterfall, the area of the Gap and the environment of The Finger where more difficulties are going to find to follow the route even being this one in perfect state that is to say without snow, ice or water in abundance. Be careful with the red arrows of the waterfall, many of them point out the old route that was followed, also in the Gap if we follow the paved path leads us directly to the small climb, also once between the two walls the route is lost and the paths we see at that point are not the ones we should follow, we have to climb the stones as if we were going to the base of the wall to find the right path that follows almost next to it. Beware of the passage through The Finger is something exposed, and upon reaching the cave if we continue along the same slope we will find a delicate and narrow passage, while if we jump to the other side we can continue with caution but without so much danger. It is important to take our references to the ascent in the waterfall and at the end of the ramp that goes up to the snowdrift from the refuge to avoid confusion on the way down. Do not be fooled by the path in the stretch that goes from the Pass of Bujaruelo to the waterfall of the chain, you will find that this disappears in a couple of points cut by what seems dry streams, if you go back a few meters you will see clearly as going up the slabs on the side these lead to the right step where you can retake the path.
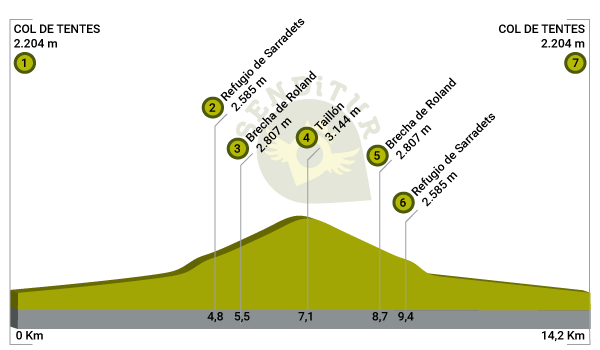
| 1-Col of Tentes | 0:00h | 2204m | 0Km | 30T 741469 4733236 |
| 2-Pass of Bujaruelo | 0:20h | 2277m | 1.7Km | 30T 740444 4732105 |
| 3-Pass of Sarradets | 1:30h | 2582m | 4.6Km | 30T 742873 4731463 |
| 4-Shelter of Sarradets | 1:35h | 2585m | 4.8Km | 30T 743007 4731319 |
| 5-Gap of Roland | 2:30h | 2807m | 5.5Km | 30T 742960 4730781 |
| 6-False Gap or The Finger | 2:55h | 2917m | 6.2Km | 30T 742305 4730816 |
| 7-Taillón | 3:45h | 3144m | 7.1Km | 30T 741541 4731017 |
| 8-False Gap or The Finger | 4:00h | 2917m | 8Km | 30T 742305 4730816 |
| 9-Gap of Roland | 4:15h | 2807m | 8.7Km | 30T 742960 4730781 |
| 10-Shelter of Sarradets | 4:35h | 2585m | 9.4Km | 30T 743007 4731319 |
| 11-Pass of Sarradets | 4:45h | 2582m | 9.6Km | 30T 742873 4731463 |
| 12-Pass of Bujaruelo | 5:25h | 2277m | 12.5Km | 30T 740444 4732105 |
| 13-Col of Tentes | 5:50h | 2204m | 14.2Km | 30T 741469 4733236 |
Coordinates UTM Datum WGS84
![]() Slope: 2444m
Slope: 2444m
![]() Slope +: 1222m
Slope +: 1222m
![]() Slope -: 1222m
Slope -: 1222m
![]() Maximum altitude: 3144m
Maximum altitude: 3144m
![]() Minimum altitude: 2204m
Minimum altitude: 2204m

This sketch of the route is not made to scale nor does it contain all the information relating to the area, it is merely indicative.

This schematic with the path is approximate and has been created from the derived cartographic base © Instituto Geográfico Nacional "Cuadrante 146-3 y 146-4 1:25.000"
Senditur has manipulated the tracks to correct the aberrant points that may exist, caused by problems with the reception of the GPS signal. In any case the tracks are always approximate. SENDITUR encourages you to use the new technologies within your reach, using them as support and consultation in your activity, not basing the realization and orientation of the same only and exclusively on them, since they may see their functioning altered by very diverse causes, not functioning correctly and their indications may not be precise.
¿Did you know that...
In the Middle Ages, the Pyrenean valleys, forced in part by their relative isolation, formed practically independent entities and these forged their own treaties or agreements with the neighbouring valleys in order to have rules for coexistence that would resolve conflicts, especially in the pastoral field, delimiting the use of pastures, the organisation of fairs and allowing the free movement of goods and people from one side of the mountain to the other. Some of these customs are still preserved today.
Don't miss out...
The Circus and Waterfall of Gavarnie, is a comfortable and simple route that will take you to the very base of the waterfall, crossing the valley until you reach the imposing circus where the highest waterfall in all of Europe is located with more than 400 meters of fall. If, on the other hand, you are on the Spanish side, there is no doubt that the Ordesa Valley and its Horsetail waterfall are a must see where you can enjoy a great number of beautiful spots.
From the commitment of SENDITUR with Nature and the respect to the balance of the environment, SENDITUR urges you to travel in a responsible way, with low environmental impact and respecting at all times the Natural, Cultural and Social environment wherever you go.
Besides sharing with all of us your experience on the route we would be grateful if you could write to us to inform us of any erroneous or outdated information you may have found, or simply to let us know what you think at Thank you.
This route has been carried out in the field by SENDITUR on 13-08-2016. The route may vary greatly depending on the time of year, weather conditions and terrain, as well as the actions of third parties and the evolution suffered in the natural environment where it is located. All opinions, advice and/or assessments made by SENDITUR in their descriptions are for guidance only and are subject to and/or refer to the specific conditions of the specific day of the route, referring to that specific day, taken from trained people, with the appropriate experience and with a high level of physical and technical preparation as a reference, as well as correctly equipped.
All the times are approximate and take an orientative character, the stops have not been taken into account, no matter how small they are. All the information related to the route, texts, images, videos, maps, diagrams, tracks, towns, and places of tourist interest are published as a guide, and may not coincide with the current state of each place. Before undertaking any activity, assess your technical knowledge, your physical condition, find out about the weather and the variations that the route may undergo, equip yourself correctly, be prudent and responsible at all times, and do not exceed your capabilities. SENDITUR is not responsible for any misuse or inappropriate use of the comprehensive guides of its routes and/or publications as well as its electronic guides, nor for any variations in their descriptions for the aforementioned reasons, and recommends that everyone be responsible and prudent in carrying out the activity. We also encourage you to read books and specialised guides to complement the information described above.
Continue watching …